Thanksgiving has come and gone and we are heading full steam into Christmas. I am lookingforward to creating some plans for next year's Halloween. The baby is here, so I might have to start working on things a little earlier to keep on-track.
One thing of which I am certain is that I am going to use both sides of the front yard rather than just one side. I am very excited.

Monday, December 7, 2009
Monday, November 9, 2009
Found!
As I was walking out the door I noticed that some of the sage's leaves were turning yellow. I decided to see if this was the case on both bushes. I walked around, looked down, and was greeted with a suprise. I found the skull that blew off the door during the wind a couple of days before Halloween.

I though I looked everywhere. Next year I think I am going to add some weight so we don't have this situation again.

R.I.P. Halloween 2009
Saturday I set out the task of taking down all the Halloween decorations in the house and in the yard. It was faster taking them down than putting them up. After I finished I took a few pictures. When it's laid out, there's not really all that much.
Take a look at some photos at http://www.flickr.com/photos/tryanpa/sets/72157622640813449/
Take a look at some photos at http://www.flickr.com/photos/tryanpa/sets/72157622640813449/
Thursday, November 5, 2009
The Manifold Mysteries of Elias Cauphen
As I was going through some papers I found this picture:

It appears to be a group photo of some secret organization. The interesting thing about this ancient, moldy photograph is that Elias Cauphen (the founder of Spooky Acres and world renowned occultist) is pictured standing behind the skull and crossbones. What is this organization? The date on the back of the photo reads “1909.” It is known that Elias Cauphen was deep into occultism by 1909. There are reports that while at University he founded a fraternal organization called “The Order of Northern Wisdom.” The purposes of the organization remain a mystery. This photo, however, seems to be the first tangible link to Elias Cauphen’s early pursuits.

Saturday, October 31, 2009
Post Trick or Treating Update
This year we had far fewer ToTs coming to the door. Last year we had hundreds of them, but this year there were far less. We did see a Michael Jackson (Pepsi commercial vintage) and what may have been two Lady Gagas, or at least what we thought might be Lady Gaga.
One of the more interesting costumes was an old-fashioned mummy. It was definitely an economy costume, but it was really well done. The best part was when the young girl turned around to leave I could see that the whole thing was held together with the silver brads that are on sports bandages. I can imagine the scene...Ok, you spin and I'll hold onto the bandage...... Mom, I'm getting sick"
Apart from what I mentioned, Halloween was much slower that it has been in years past. I will probably have to start thinking about taking all of the decorations down.
Now that the Trick-or-treaters have trickled down to none, the gates of Spooky Acres creak as they slowly close. The ghosts, goblins, ghoulies, and other ghastly creatures want to start their own Halloween party.
One of the more interesting costumes was an old-fashioned mummy. It was definitely an economy costume, but it was really well done. The best part was when the young girl turned around to leave I could see that the whole thing was held together with the silver brads that are on sports bandages. I can imagine the scene...Ok, you spin and I'll hold onto the bandage...
Apart from what I mentioned, Halloween was much slower that it has been in years past. I will probably have to start thinking about taking all of the decorations down.
...
Now that the Trick-or-treaters have trickled down to none, the gates of Spooky Acres creak as they slowly close. The ghosts, goblins, ghoulies, and other ghastly creatures want to start their own Halloween party.
Happy Halloween
Well, the day is here and the ghoulies and goblins are gearing up for some Halloween fun. I hope your festivities are joyous and safe.
Tuesday, October 27, 2009
Tragedy!
Valerie and I came home from a doctor's appointment and something terrible happened.
I made a cool skull decoration for the front door. I didn't spend too much time on it, but it still looked really neat. It was an extra large version of my skull icon that I have used on other pieces of Spooky Acres. I hung it on the door and it vanished on the wind that blew up this afternoon. If you are driving in central Phoenix and see a large skull made out of styrofoam flitting on the wind, it's mine.
A Door Without a Skull is Unthinkable!
It was a bright Saturday morning in Phoenix. The air was cool (for a change) and the birds were singing and there was the sound of a crazy man carving pieces of styrofoam.
I had a fair ammount of scrap left over from the coffin, so I thought I would craft something for the door. What came to mind is a skull. I felt that the cow skull came out so well that I could replicate it with my "signature" skull graphic. After a flurry of styrofoam snow I had the rough shape. I gave it a coat of paint similar in steps to the cow skull. After several coats and painting the eyes, it was ready to hang.
We have a nice door. I remember paying a lot to have it hung and painted and my wife would never forgive me if I damaged it. The tacky paint on the back edge of the skull would certainly leave a mark on the door. So, I packed myself up and headed over to Michael's. I found a really nice piece of stiff felt (black of course) bought it and brought it home. I cut the felt to the exact shape of the skull and glued it to the back with some Tacky Glue. I added a piece of wire and there you go; a decorative skull to hang on your front door. Martha's jealous I know it!
Bloody Labels
One of the coolest Halloween projects you can do is make faux labels for empty bottles. Fot this project I took several glass bottles. I had been saving them over the course of the year. Whenever we would finish a jar of peanut butter or splurged on a bottle of Italian Soda from Target (yum!) I rinsed out the bottle and cap with very hot water and stored it in the laundry room. Over the course of a year you would be suprised how many bottles you end up using. Some bottles are embossed with company logos. For this project I couldn't use them, so into the recycle bin they went.
I decided to use one of the Italian Soda bottles. They look nice and are quite large. Thh next step was to come up with a design for a label. If you are not feeling creative, then you can go to the intertubes and find some really nice pre-made labels (I believe Love Manor has a Flickr set with some really great ones) otherwise you can use a computer and a laser printer.
I say use a laser printer for a good reason. After I print my label I age it in a tea bath. The inks on an inkjet printer are not indelible and will run if placed in water. You can always print out your label and then copy it on a standard photocopier. Usually those are toner based and will make text that is generally resistant to water.
Regardless, I decided to make my own lables. Once again, inspiration can be found on the intertubes. I am not sure what channel, but you can always check the guide. I wanted to make a bottle of Vampire Blood. Now, you might say that vampires don't really have blood and that they "borrow" blood from others. I would tend to agree. In the pantheon of vampire lore it dosen't make much sense, but I am the one making the stupid bottle. You can make a bottle of Victim's Blood if you want.

I printed out the labels and separated them from the page. I wasn't sure what look I wanted, so I printed a few to see what would happen. I cut several, ripped several with a strait edge, and then ripped several with abandon. I like the ones ripped with abandon, but at this point, I was keeping an open mind. You may have noticed the large dots on the label above. I wanted to simulate paper with some mold spots. I had a brown Crayola Magic Marker and I used it to make some random dots. I let the pen really soak the paper because I knew that I was going to keep the labels in the tea bath for a while and I didn't want the dots to disappear.
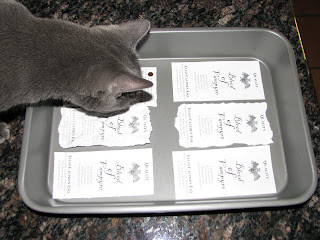
After Betsy's aproval I prepared the tea bath. I used loose leaf tea from a really great tea shop in Portland, OR. You can use any tea, but good old English Breakfast is the best. English Breakfast is black and tannin-filled, plus it smells delicious. I've used Twinings and it works very well. I brewed the tea in a pot and let it sit 10 minutes (with a cozy of course! What am I...a farmer?) I poured it into the pan with the labels. After letting the pan of tea and lables sit for a good 30 minutes, I fished out the labels and this is what I found...

Goody! Wet paper! Maren would be so excited. Let them dry and this is what is made...

Don't they look old and spooky! They darken considerably after air drying. I took my favorite and adheared it to a bottle filled with a suspicious red liquid. Could it be blood? I brushed some glue mixed with water on the face of the label to make sure it wrinkled nicely.

In general I am quite happy with it. I am going to do some more distressing to make the whole thing appear ancient, but that is for another time.
Thursday, October 22, 2009
More Spooky Acres Photos
You can find more photos on my Flickr Stream at:
http://www.flickr.com/photos/tryanpa
http://www.flickr.com/photos/tryanpa
Monday, October 19, 2009
The Rootin'est Tootin'est Gulch Sign in Phoenix

I had a chance to finish the Spooky Gulch sign. What I like most about the sign is the cow skull at the top. It is simultaneously funny and slightly creepy. The sign is a bit of an afterthought. I wasn't really trying to create a western themed haunt, I just thought a little something in the rocky desert island would be nice. I intend to take some better pictures in the nights ahead. I got out there with my camera and tripod (which is really a cat litter box) a little too far into dusk.
The stand/tripod for the sign is made of leftover 2x2s from another project. I attached them in a slightly sloppy way to make it look like some cowboy put it together while out ridding the range. I might add some rope around the jount to hide the screws. The only thing that would make it better would be a bottomless pit in the form of a haunted mine. You could decorate the space behind the two-way mirror with miniature wood supports.

Other than that I just added a ghost made out of a tomato cage, lights, and a fabric shower curtain. I was inspired by a Lowe's fall design circular. It's a little cheesy, but I think that the orange lights look really fun!
Wednesday, October 14, 2009
Yard Haunt Photo of the Day

This is a good shot of the coffin with the flickering lamp. I particularly like the windows of the house behind. The glow is nice.
We have been so busy getting ready for the baby that I haven't had as much time to work on Halloween as I would like.
Something I have recently become interested in is the works of H. P. Lovecraft. I had heard his name mentioned several times, but it wasn't until recently that I started to read his short stories. If you haven't heard of him, you can read about him. Or, even better, read a few of his stories. The settings are evocative and the plots are interesting. Lovecraft was writing at a time when the horror/science fiction genre was called "weird tales." They are good stories and there is a very active community of fans.
Apart from that Spooky Acres is still plugging along. I entered in an HGTV photo contest. You can find the photos on their web page. I still need to get Spooky Gulch launched, but I am having trouble coming up with a good mounting method for the sign. I don't want to put holes through my hard work. I'm going to brainstorm for a while and see what I come up with.
Saturday, October 10, 2009
Giddy-Up 'ter Spooky Gulch

Don, one of the previous owners of our house, was a fan of desert landscape. He also loved circular drives. This love spawned the island in our circular drive. It is home to a very large saguaro cactus. This is where Spooky Gulch is going to be. I am in the process of adding some bits and pieces, but you can see the completed sign and a cow's skull that is still in the painting process

Friday, October 9, 2009
Halloween Cupcake Wrappers

When I imagine a magical world filled with personified sweet foods, I imagine cupcakes dressed up for Halloween. It's just who I am. Anyway, surfing the intertubes with my intertube device I stumbled upon these cupcake wrappers. For the budding Betty Crockers among us (ask me about my ganache) would be intrigued by the possibilities these little paper wrappers could provide.

Tuesday, October 6, 2009
Cool Yard Photo of the Day
I went onto the intertubes to find some information on night photography. Taking what I learned from the web and the one photo class that I took at Carl Hayden Community High School I took this picture. I am proud of how the yard looks this year.
Enjoy!

Enjoy!

Monday, October 5, 2009
2009 Spooky Acres is Up and Haunting!

To see the rest of the photos click on this link:
Sunday, October 4, 2009
Spooky Acres 2009 will be up soon!
Stay tuned for some pictures of our yard. I will post some tonight (10/4) as it is the night I have decided to put up the haunt.
Some of the new features may include:
A spooky flickering lantern
A lifelike coffin (see my earlier post)
A creepy wreath stand
A new lighting scheme
Some of the new features may include:
A spooky flickering lantern
A lifelike coffin (see my earlier post)
A creepy wreath stand
A new lighting scheme
Monday, September 21, 2009
The Decaying Wreath
Outside the doors of the mausoleum in Spooky Acres you will find a wreath on a wrought iron stand. It seems to have been left there from a funeral long past. The leaves of the wreath are dried and brown. Some leaves have even started to fall to the ground...


The wreath is made from Mesquite branches clipped from our tree in the front yard. It grows really fast and I find myself with a large number of these branches. From the tree they are very pliable and as such they are very easy to weave into a wreath form. I imagine any tree or bush cuttings that are pretty green would be usable. The leaves of mesquite dry out to a really sad brown color which I think is perfect for a yard haunt. After I made the wreath and let it dry out in the sun for a while I made the stand.
The stand is actually made from some old curtain rods. When we moved in there were curtains in our living room. My wife and I put up with these curtains for a long time. Finally, we decided to get rid of the curtains and put in blinds. We had some made and the room looks wonderful, but I had two sets of rods with the strange fire-like finial. When I was painting the coffin (seen in the picture above) I took one of the rods and gave it a coat of black paint. The Lincoln Cottage Black that I use dries to the right look of wrought iron.

I cut two legs in addition to the one that I had already painted. Then I drilled some holes and bolted everything together. I didn't quite line up the holes on the leg with the finial, but I don't think it is very noticeable. A cup hook finishes up the structure and it is ready for displaying.
I am going to add some black ribbon and bows to give it an extra creepy feel, but overall I like it. I guess this year's additions to the haunt are mostly small subtle things that bring it all together.
Friday, September 11, 2009
The Coffin is Done!

It's Friday at 8:30p and I have finally finished building and painting the coffin. It hasn't been remarkably hard. I based my coffin off the immeasurably helpful Spooky Blue tutorial. My wood graining is all faux (rather than carved in) and I used extruded polystyrene rather than the blue insulation. I can't seem to find it at Lowes. I guess that it doesn't get cold enough here in phoenix to warrant it. To do the paint treatment I checked out My Ghoul Friday's tutorial.
Now I get to start working on the animatronic component. It's going to be horrific!
Tuesday, September 8, 2009
Ghosts of Haunts Past

This is one of the first tombstones that I ever created. It turned out pretty well and I still use it today. I love the skull at the top. I use a similar skull on several other pieces in the haunt.
The inscription, like all the inscriptions that I have used, comes from Disneyland's Haunted Mansion. It is my little homage to the greatest haunt. To carve the inscription I printed out the words and then taped the sheet to the white styrofoam board. Using an Exacto knife I painstakingly carved out each letter. It is all hand done. I do not use a hot wire cutter or anything else. After the carving a coat of black plaint (Lincoln Cottage Black from Valspar) and then a coat of grey spray paint (latex).
I have never really done any weathering to the stones, because I am afraid to do it. If you have any suggestions on how to make the stones "pop" I would love to hear.
Thursday, September 3, 2009
New To The Yard

This year, because of the baby, I am not going to be adding too much to the Halloween extravaganza. I have one idea presented here in a detailed and very professional sketch.
As you can see it is a spooky coffin with some spooky hands. The base of the coffin is already done and painted. I need to find a lantern (I hear Walmart has these particular kinds) and make a shovel.
"Why not use a real shovel?" you ask. Well, the wife and I are concerned that someone might steal a shovel and do mischief to himself or others. I have the same concern about any tools left in the yard. I don't want the liability of a crazed zombie manic using the aforementioned shovel to hack apart unsuspecting Halloween revelers. Think of the mess! Think of my premiums!
Instead I will be crafting something that is almost, but not quite entirely, unlike a shovel out of foam. I will take some pictures of the coffin tonight before it gets dark...or maybe after it gets dark! Bhuaaaaaa!
Tuesday, September 1, 2009
The Spooky Acres Philosophy
When I was designing the first phase of my haunt I had a pretty clear idea of what kind of norms I wanted for the display. I have never been a fan of gore. I don’t like bloody movies. I also do not like being scared. I think the representations of people in humiliating situations or in pain go beyond entertainment and become desensitizing. With all these peccadilloes I created the six rules of Spooky Acres. I might go back and revise them from time-to-time, but I think that they are pretty good.
1. No blood or gore.
2. Never represent a human being:
a. in a humiliating position.
b. in the throws of agony or pain.
3. Any depiction of the human form should be as unrealistic as possible (i.e. cartoonish).
4. No active frights. (By this I mean there will be nothing jumping out at the audience. No compressed air cannons. No haunt actors grabbing at people, etc.)
5. Never put the audience in harm’s way. (An extension of #4)
6. When given the choice between macabre and humor, choose humor.
Even with all these rules in place you can still have a yard haunt that has quite a bit of atmosphere. Halloween can be fun and just a little spooky.
Great Link...
If you haven't pointed your intertubes device to http://www.hauntproject.com/ yet, you should. Haunt Project (maintained by Professor Evil) gives ghastly how-tos on almost every aspect of the yard haunt. Many of my ideas have either been inspired or stolen wholesale from this page. Take a look.
Monday, August 31, 2009
Welcome to Spooky Acres

Since my wife and I moved into our mid-century brick home in central Phoenix, I have been haunting our yard. It started with just a few pumpkins and evolved into a themed haunt. This blog comes to life three years into my haunt and I hope to show you how this haunt continues to grow and improve.
My next post will detail the philosophy and history behind Spooky Acres.
Subscribe to:
Posts (Atom)